Tooltips can play a big role in your web designs and that isn’t new anymore. Just use them correctly and they will help you improve user experience.
We have seen before how to create some good looking CSS3 tooltips and today you’ll learn how to create an image map with pins and tooltips.
The idea
A while ago, I had to create an image map with tooltips and, being inspired by some cool tooltips I noticed on Firefox’s website, I decided to create these ones.
The principal purpose was to have something that is easy to use and update, without needing any developing knowledge.
As you will see further, you won’t need any developer skills to add pins with tooltips to an image. You’ll just need to add a div with your content and set two HTML5 custom attributes for positioning it. I’d say is simple enough.
HTML5 data attributes and jQuery
HTML5 has a cool feature named “custom data attributes”, which can help you store arbitrary snippets of metadata for the purpose of making your Javascript code simpler. So, the thing is that now you can avoid using attributes like rel or title for Javascript purposes.
Here’s how the syntax looks:
<div data-foo="bar"></div>… and this is how you can get the above value with jQuery:
var test = $('div').data('foo');In this article, we’ll use data attributes to store information like positioning coordinates for our map pins. If you want to read more about HTML5 custom data attributes, go to MDN web docs.
The HTML
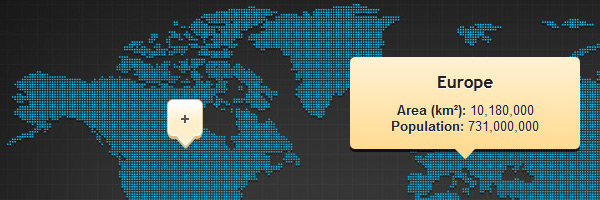
  <div id="wrapper">
    <img  width="920" height="450"
          src="world-map.jpg"
          alt="World continents">
    <div class="pin pin-down" data-xpos="450" data-ypos="110">
        <h2>Europe</h2>
        <ul>
          <li><b>Area (km²):</b> 10,180,000</li>
          <li><b>Population:</b> 731,000,000 </li>
        </ul>
    </div>
</div>-
#wrapper- This is the element that wraps all the other elements. Itspositionvalue isrelativeand I bet you guess why’s that. -
img- the image that will behave as “background”. -
.pin- Thisabsolutepositioned element contains the pin and also the tooltip content which will be displayed on mouseenter event. Additionally, thepin-downclass specify the pin type. -
data-xpos="450" data-ypos="110"- HTML5 custom attributes that help you specify the X (left to right) and Y (top to bottom) axis values (px) for positioning the respective map pin. In this example, the pin will be positioned 450px from left to right and 110px from top to bottom.
The CSS
There’s no much to explain here, I think the following lines are quite easy to understand:
  /* Relative positioning*/
  #wrapper {
    position: relative;
    margin: 50px auto 20px auto;
    border: 1px solid #fafafa;
    box-shadow: 0 3px 3px rgba(0,0,0,.5);
  }

  /* Hide the original tooltips contents */
  .pin {
    display: none;
  }

  /* Begin styling the tooltips and pins */
  .tooltip-up, .tooltip-down {
    position: absolute;
    background: url(arrow-up-down.png);
    width: 36px;
    height: 52px;
  }

  .tooltip-down {
    background-position: 0 -52px;
  }

  .tooltip {
    display: none;
    width: 200px;
    cursor: help;
    text-shadow: 0 1px 0 #fff;
    position: absolute;
    top: 10px;
    left: 50%;
    z-index: 999;
    margin-left: -115px;
    padding:15px;
    color: #222;
    border-radius: 5px;
    box-shadow: 0 3px 0 rgba(0,0,0,.7);
    background: #fff1d3;
    background: linear-gradient(top, #fff1d3, #ffdb90);
  }

  .tooltip::after {
    content: '';
    position: absolute;
    top: -10px;
    left: 50%;
    margin-left: -10px;
    border-bottom: 10px solid #fff1d3;
    border-left: 10px solid transparent;
    border-right :10px solid transparent;
  }

  .tooltip-down .tooltip {
    bottom: 12px;
    top: auto;
  }

  .tooltip-down .tooltip::after {
    bottom: -10px;
    top: auto;
    border-bottom: 0;
    border-top: 10px solid #ffdb90;
  }

  .tooltip h2 {
    font: bold 1.3em 'Trebuchet MS', Tahoma, Arial;
    margin: 0 0 10px;
  }

  .tooltip ul {
    margin: 0;
    padding: 0;
    list-style: none;
  }
The jQuery
Below you can find the jQuery code that will execute when the page loads:
  $(document).ready(function(){
    // set the wrapper width and height to match the img size
    $('#wrapper').css({'width':$('#wrapper img').width(),
                      'height':$('#wrapper img').height()
    })

    //tooltip direction
    var tooltipDirection;

    for (i=0; i<$(".pin").length; i++)
    {
      // set tooltip direction type - up or down
      if ($(".pin").eq(i).hasClass('pin-down')) {
          tooltipDirection = 'tooltip-down';
      } else {
          tooltipDirection = 'tooltip-up';
          }

      // append the tooltip
      $("#wrapper").append("<div style='left:"+$(".pin").eq(i).data('xpos')+"px;top:"+$(".pin").eq(i).data('ypos')+"px' class='" + tooltipDirection +"'>\
                                          <div class='tooltip'>" + $(".pin").eq(i).html() + "</div>\
                                  </div>");
    }

    // show/hide the tooltip
    $('.tooltip-up, .tooltip-down').mouseenter(function(){
                $(this).children('.tooltip').fadeIn(100);
            }).mouseleave(function(){
                $(this).children('.tooltip').fadeOut(100);
            })
  });
How it works and how to use it
This is an example that works even on older browsers like IE6, though CSS3 features like gradients and shadows won’t be available of course.
-
Set the image (within
<div id="wrapper">element) you wish to add pins for. -
Add the content you need to displayed as a pin with tooltip in
<div class="pin" data-xpos="450" data-ypos="110"> -
From now on, the jQuery will do the rest:
* Based on the image dimension, the relative wrapper inherits the image's `width` and `height`.

* The initial content you added will be hidden (this is done via CSS) and new elements will be appended based on initial content.

* Also, the appended pins and tooltips will be positioned using the coordinates you added as HTML5 data attributes.

* Then, using `mouseenter` and `mouseleave` events, the tooltips are displayed/hidden.
That’s all!
I hope you enjoyed this tutorial and feel free to get in toch if you have any suggestions. Thanks for reading!